FmrbGfx
Note
Under construction.
FmrbGfx is the class that provides drawing APIs. In apps that inherit from FmrbApp, it is accessible as @gfx.
Nothing appears until present is called
All drawing commands are accumulated in a buffer. They are transferred to fmruby-graphics-audio and rendered on screen when @gfx.present is called.
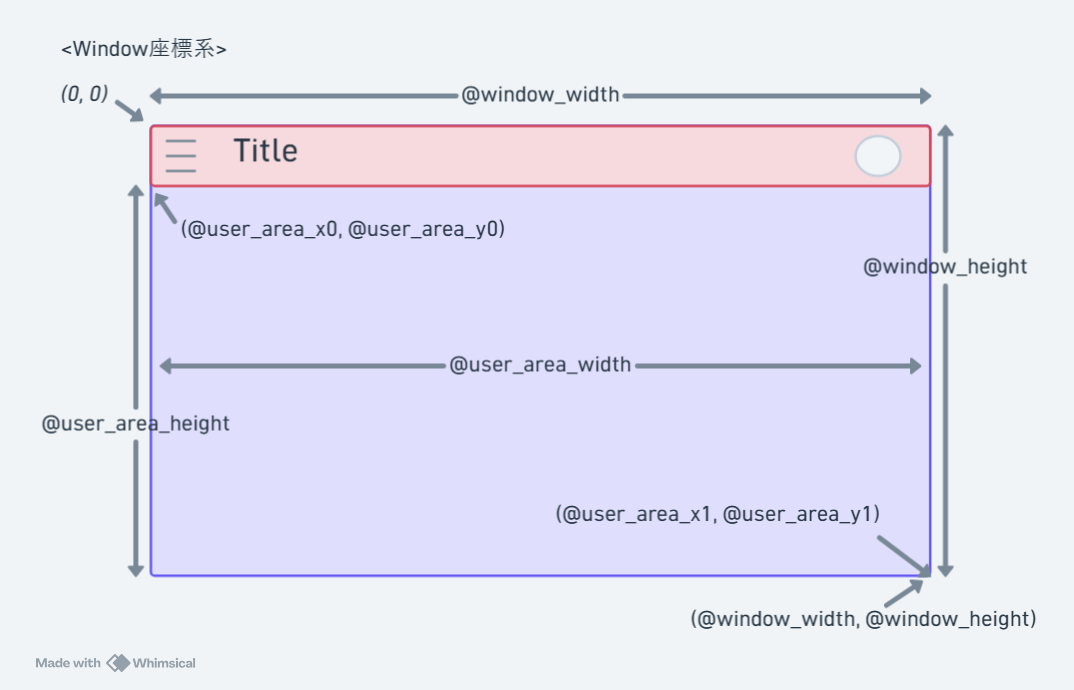
Coordinate System
The origin (0, 0) is at the top-left of the window, with X increasing to the right and Y increasing downward. You cannot draw outside the window.
Each window has its own coordinate system. See the image below for reference.
Color
Uses RGB332 (8-bit, R:3 G:3 B:2). Specified as an integer from 0x00 to 0xFF.
For some colors, constants like FmrbGfx::WHITE are also provided. A helper method FmrbGfx.rgb_to_332(r, g, b) is available to convert from 24-bit values.
You can also check colors on sites like this one.
A feature for using a single designated color as a transparent color is also available.
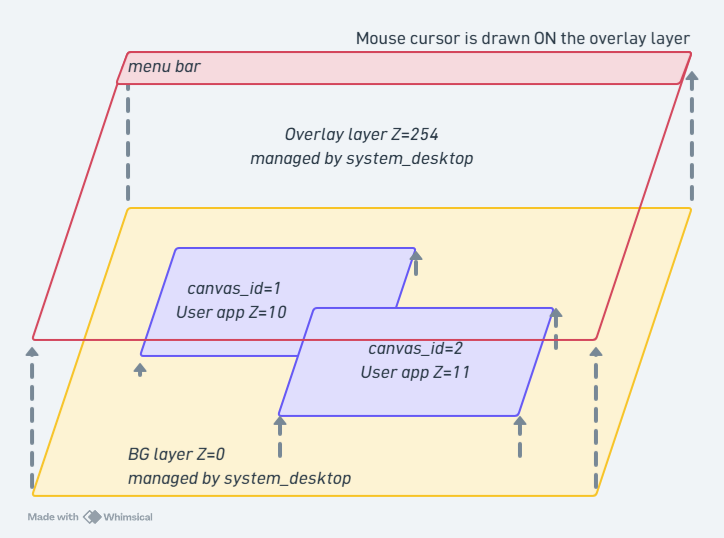
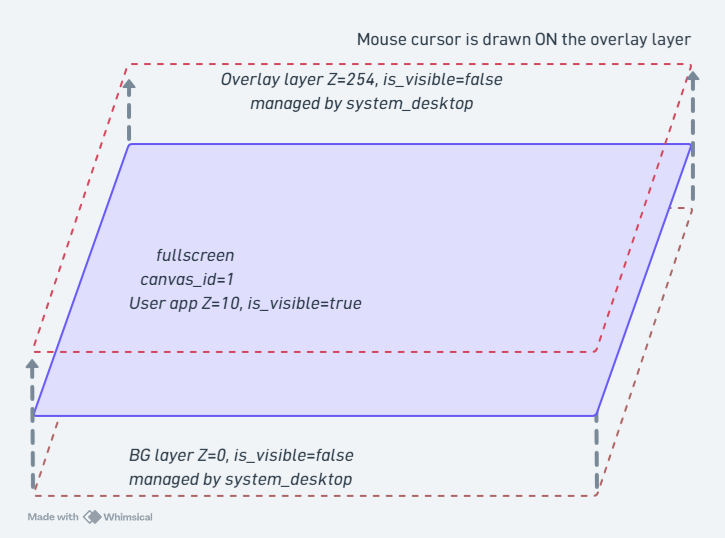
Drawing Layer Overview
Drawing layers in normal mode
Drawing layers in fullscreen mode
Color Constants
| Constant | Value |
|---|---|
FmrbGfx::BLACK |
0x00 |
FmrbGfx::WHITE |
0xFF |
FmrbGfx::RED |
0xE0 |
FmrbGfx::GREEN |
0x1C |
FmrbGfx::BLUE |
0x03 |
FmrbGfx::YELLOW |
0xFC |
FmrbGfx::CYAN |
0x1F |
FmrbGfx::MAGENTA |
0xE3 |
FmrbGfx::GRAY |
0x6D |
Color Conversion
FmrbGfx.rgb_to_332(255, 128, 0)  # -> 0xF0 etc.
FmrbGfx.hsv_to_rgb(120, 255, 255) # -> [r, g, b] (each 0..255)
Control Methods
| Method | Purpose |
|---|---|
clear(color) |
Clear the entire screen |
present |
Apply accumulated drawing commands to the screen |
Basic Shapes
All take a color (RGB332) as the last argument.
| Method | Signature |
|---|---|
set_pixel |
set_pixel(x, y, color) |
draw_line |
draw_line(x1, y1, x2, y2, color) |
draw_rect |
draw_rect(x, y, w, h, color) (outline only) |
fill_rect |
fill_rect(x, y, w, h, color) (filled) |
blend_rect |
blend_rect(x, y, w, h, color, mode:) (mode: 0=ADD, 1=XOR) |
draw_circle |
draw_circle(x, y, r, color) |
fill_circle |
fill_circle(x, y, r, color) |
draw_ellipse |
draw_ellipse(x, y, rx, ry, color) |
fill_ellipse |
fill_ellipse(x, y, rx, ry, color) |
draw_round_rect |
draw_round_rect(x, y, w, h, radius, color) |
fill_round_rect |
fill_round_rect(x, y, w, h, radius, color) |
draw_triangle |
draw_triangle(x0, y0, x1, y1, x2, y2, color) |
fill_triangle |
fill_triangle(x0, y0, x1, y1, x2, y2, color) |
draw_arc |
draw_arc(x, y, r0, r1, angle0, angle1, color) |
fill_arc |
fill_arc(x, y, r0, r1, angle0, angle1, color) |
Angles for draw_arc / fill_arc are integers in degrees. r0 is the inner radius, r1 is the outer radius.
Text Drawing
@gfx.set_text_size(2)             # 1 to 4
@gfx.draw_text(10, 20, "Hello",
               FmrbGfx::BLACK)    # No bg -> transparent
@gfx.draw_text(10, 40, "Hi",
               FmrbGfx::WHITE,
               FmrbGfx::BLUE)     # With bg -> opaque
| Method | Purpose |
|---|---|
set_text_size(size) |
Text size. 1 to 4 |
draw_text(x, y, text, color [, bg_color], mixed: false) |
Draw text. mixed: true enables ASCII/Japanese hybrid rendering |
set_font(family, size = nil) |
Switch font (see below) |
current_font / current_text_size |
Current font / size (read-only) |
Japanese Text and Font Switching
By switching to a Japanese font with set_font(family, size), you can draw UTF-8 strings directly.
# Default ASCII font (Font0, 6x8)
@gfx.set_font(:default)
@gfx.draw_text(10, 20, "Hello", FmrbGfx::BLACK)

# Japanese 8px (misaki_8, small size matching the system UI)
@gfx.set_font(:ja, 8)
@gfx.draw_text(10, 40, "こんにちは", FmrbGfx::BLACK)

# Japanese 12px (efontJA_12, larger and more readable)
@gfx.set_font(:ja, 12)
@gfx.draw_text(10, 60, "ファミリーmruby", FmrbGfx::BLACK)
Supported Fonts
family |
size |
Description |
|---|---|---|
:default |
(not specifiable) | Font0 6x8 ASCII. Default at startup |
:ja |
8 |
misaki_8 8x8, same size as system UI |
:ja |
12 |
efontJA_12 12x12, more readable |
Hybrid Drawing (mixed: true)
Strings containing mixed ASCII and Japanese characters can be drawn in a single draw_text call. ASCII portions are rendered with Font0 (6x8) and UTF-8 multibyte portions with misaki_8 (8x8).
@gfx.draw_text(10, 20, "puts 'こんにちは'",
               FmrbGfx::BLACK, mixed: true)
Convenient for code examples and bilingual UI strings.
draw_window_frame saves and restores the font
FmrbApp#draw_window_frame always draws the title bar with the default 6x8 font and then restores the font setting from before the call. There is no need to call set_font again each frame in your app.
JA font loading cost
The first call to set_font(:ja, ...) takes several tens of milliseconds as the WROVER side prepares the font data. Ideally, call it once in on_create.
Example (Japanese)
class HelloJaApp < FmrbApp
  def on_create
    clear_user_area(FmrbGfx::WHITE)
    @gfx.set_font(:ja, 12)
    @gfx.draw_text(@user_area_x0 + 8, @user_area_y0 + 8,
                   "こんにちは、Family mruby!", FmrbGfx::BLACK)
    draw_window_frame
    @gfx.present
  end
end

HelloJaApp.new.start
A sample that switches between modes (default / 8px / 12px / Mixed / Hybrid / Scaled) is available in /app/demo/ja_text.app.rb.
Image API
# File transfer (PC -> flash)
@gfx.transfer_file("local.bmp", "/img.bmp")

# Load and draw an image
img = @gfx.create_image_from_file("/img.bmp")
@gfx.draw_image(img[:id], 10, 20)               # Original size
@gfx.draw_image(img[:id], 10, 20, scale_x: 2.0,
                scale_y: 2.0)                   # 2x scale
@gfx.delete_image(img[:id])
| Method | Return Value / Purpose |
|---|---|
transfer_file(src, dst) |
true on success, raises exception on failure |
file_status(path) |
{exists:, size:} |
create_image_from_file(path) |
{id:, width:, height:} or nil |
draw_image(id, x, y, scale_x: 1.0, scale_y: 1.0) |
Draw an image |
draw_tile(image_id, src_x, src_y, w, h, dst_x:, dst_y:) |
Copy a sub-region of an image to (dst_x, dst_y). For tile map use |
delete_image(id) |
Release the image |
Supported image formats
create_image_from_file supports RGB332 BMP. See Image & Icon Files for format details.
When to Use draw_tile
You can directly stamp part of a SpriteImage onto the canvas without creating a SpriteInstance. This is suitable for BG rendering where you tile 16x16 cells from a tile sheet image one by one. The transparent color of a SpriteImage created with use_transparent: true is respected, enabling layered map drawing.
sheet = SpriteImage.new(@gfx, width: 64, height: 32,
                          transparent_color: 0, use_transparent: true)
sheet.load_bmp("/usr/share/sprites/tilesheet.bmp")
# Draw 16x16 from tilesheet at (0, 0) to canvas at (32, 16)
@gfx.draw_tile(sheet.id, 0, 0, 16, 16, dst_x: 32, dst_y: 16)
For a higher-level wrapper, see TileMap.
Composite Region Specification (set_composite_regions)
@gfx.set_composite_regions([
  {dst_x: 0,   dst_y: 0,   w: 4, h: 4, transparent: true},   # Top-left rounded corner
  {dst_x: w-4, dst_y: 0,   w: 4, h: 4, transparent: true},   # Top-right
  {dst_x: 0,   dst_y: 4,   w: w, h: h - 8, transparent: false},  # Center is opaque
  # ...
])
A performance API that specifies which rectangles of the canvas are composited and how (transparent mode / opaque mode). Useful for rounded-corner windows where only the corners use transparency while the center uses a fast memcpy path. Maximum 8 regions. Passing nil or [] clears the setting.
Normally, the system configures this via the rounded_corners flag in .toml (App Configuration > rounded_corners), so user apps rarely need to use this directly.
NTSC Output Adjustment (ESP32 Only)
| Method | Purpose | Range |
|---|---|---|
set_output_level(level) |
Overall brightness | 0..255 |
set_chroma_level(level) |
Saturation (color burst amplitude) | 0..255 |
Used for color adjustment on CRT monitors (see NTSC Output Test sample).
Example: Drawing Shapes
class ShapesApp < FmrbApp
  def on_create
    clear_user_area(FmrbGfx::WHITE)
    x = @user_area_x0 + 5
    y = @user_area_y0 + 5
    @gfx.fill_rect(x, y, 30, 20, FmrbGfx::RED)
    @gfx.fill_circle(x + 60, y + 10, 10, FmrbGfx::GREEN)
    @gfx.draw_round_rect(x + 90, y, 30, 20, 4, FmrbGfx::BLUE)
    @gfx.draw_text(x, y + 30, "Shapes",
                   FmrbGfx::BLACK)
    draw_window_frame
    @gfx.present
  end

  def on_update
    500
  end
end

ShapesApp.new.start
Notes
Batch drawing with present
Within on_update, which is called at high frequency, it is recommended to issue multiple drawing commands and then call present only once. Calling present after every individual command can saturate the UART bandwidth.
Do not draw outside the window frame
Draw within the @user_area_x0/y0/width/height bounds. Overwriting the title bar or borders will break the visual appearance.